
(Solved) 2003 Honda does not crank and it’s not the starter
Affiliate Disclosure: As an Amazon Associate, we may earn commissions from qualifying purchases from Amazon.com.
Here is a list of tools I use every day at the shop. Let me know if you use them too in the comments!
Customer Complaint:
This 2003 Honda Accord with a manual transmission came into the shop with the complaint of the starter not cranking the engine. When you use the key to turn the ignition to “start”, nothing happens. They have already replaced oxygen sensors, relays, and fuses, but nothing has fixed this issue.
First Thoughts:
A “no crank” situation is extremely common in vehicles. It can be something as simple as a starter, or something complex like an engine computer.
What are some common reasons why a vehicle will not crank?
Here is a list of common reasons why your car will not crank.
Dead Battery
Bad Starter
Broken Wire
Bad Starter Relay
Blown Fuse
Bad Engine Computer
Even though the items listed above are common, it does not mean they should be replaced when this problem arises. Proper diagnostics should be performed to find the root cause of a “no crank” situation.
Diagnostics:
The first part of my diagnostic process with this Honda Accord was to go directly to the starter and check for the proper voltages.

On this car, I wanted to see power (12 volts), ground (0 volts), and a start signal (12 volts when the key is in the “start” position).
For testing the voltages, I used the Power Probe 3. It has to be my favorite tool I own, especially when it comes to checking electrical issues. Here is a link to the one I use on Amazon.

Generally, the starter on a vehicle will have a main power wire that has 12 volts. The starter will be grounded through the casing which is bolted directly to the engine block. The start signal is usually the smaller wire that activates the starter solenoid. In most cases, it will have 12 volts when the ignition switch is turned to “start”.
I was expecting to have everything and this car would only need a starter, but I was missing the start signal.
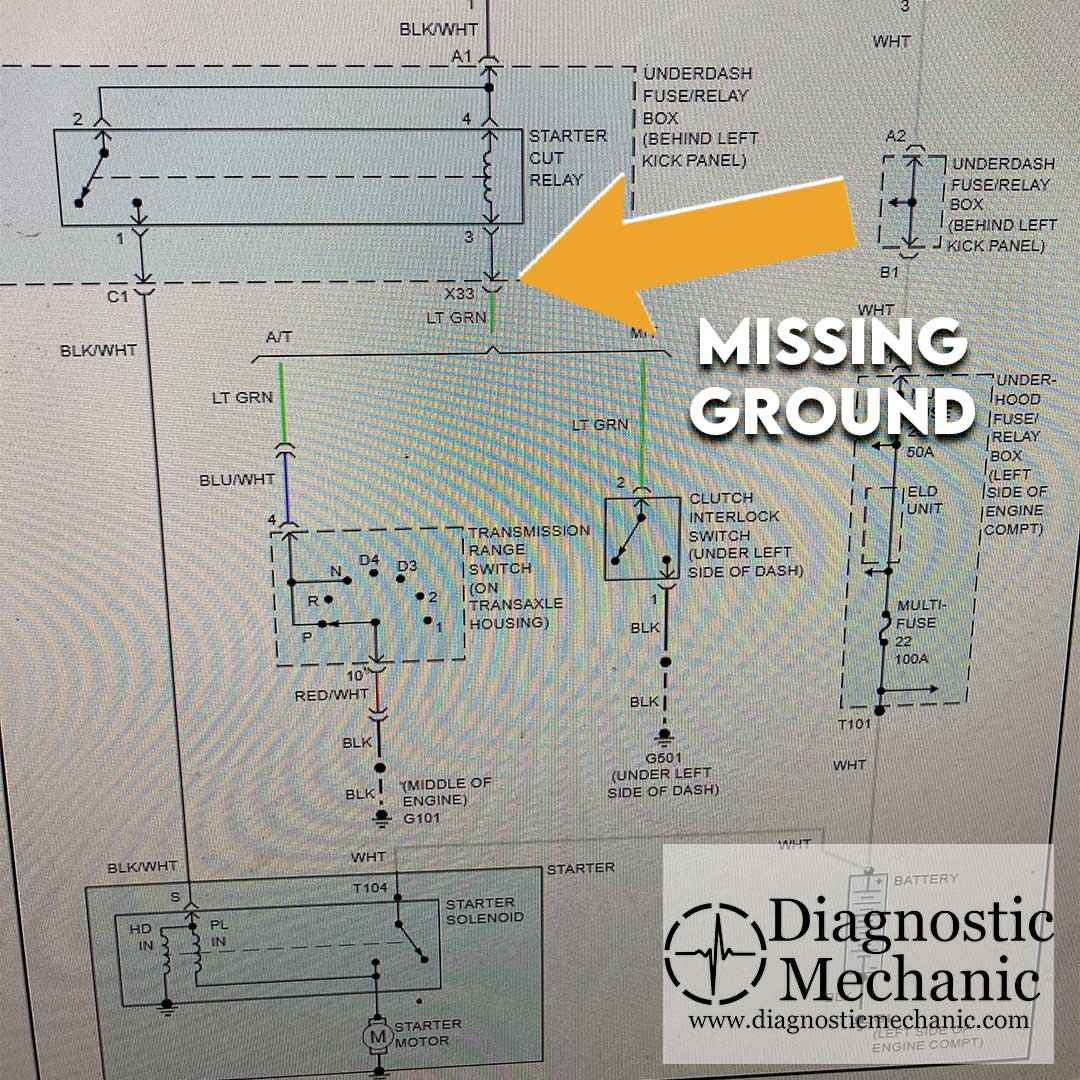
It was time to look up a wiring diagram.
The wiring diagram led me to the starter relay. On this vehicle, it’s called a starter cut relay.

Looking at the relay, I noticed it looked different from the others and noticeably newer.
I removed the relay to check the voltages.
On this relay, It has two 12 volts pins when the key is in the “start” position, a ground pin from the starter, and another ground from the clutch interlock switch.
The clutch interlock switch is a safety measure to make sure the clutch is depressed while the starter is engaged. If the car was in gear while the starter was engaged, the vehicle could potentially start moving by itself.
How this relay works:

Load Side (Power) - Power (12 volts) when the ignition is in the “start” position.
Control Side (Power) - Power (12 volts) when the ignition is in the “start” position.
Control Side (Ground) - Ground (0 Volts) when the clutch is depressed.
Load Side (to the Starter) - Ground (0 volts) until the relay is energized, then has power (12 volts)
This relay has 4 pins.
There are two for the control side and two for the load side.
When the clutch is depressed, it presses the clutch interlock switch which sends a ground to the control side of the starter cut relay.
When the key is turned to “start”, the ignition switch sends 12 volts to the control side of the relay and the load side of the relay.
When the control side of the relay has both 12 volts and a ground, the relay closes internally.
When the relay closes, the 12 volts on the load side is sent to the starter solenoid.
When testing, I noticed that the 12 volts on the control side and load side were present, but the ground on the control side was not there.
The clutch interlock switch was not sending a ground.
The next step was to check to see if the clutch interlock switch had a ground to send.

The clutch interlock switch has two wires connected to it. One wire has a constant ground and the other wire only has a ground when the switch is pressed.
When I tested the two wires with the clutch depressed, I only had one ground.
It could be 2 things. Either the clutch interlock switch is bad or it is not being pressed when the clutch is depressed.
I reached my hand up the clutch pedal assembly to manually press the clutch interlock switch, and it started to work.
I had ground on both sides, which means the clutch interlock switch works.
I removed the clutch pedal assembly and immediately saw the problem.

The plastic tab that the clutch interlock switch presses against was missing.
Without this plastic tab, the clutch interlock switch will not work properly.
After a quick look around, I found the plastic tab hiding underneath the floor mat.

After making sure the tab was not damaged, I placed it back into the clutch pedal assembly.
I added some glue to hold it in place and prevent it from falling out again.

After installing everything back together, the Honda started perfectly!
Fixed!
Disclaimer and Disclosure:
Due to factors beyond the control of DiagnosticMechanic.com, it cannot guarantee against unauthorized modifications of this information, or improper use of this information. DiagnosticMechanic.com assumes no liability for property damage or injury incurred as a result of any of the information contained in this website. DiagnosticMechanic.com recommends safe practices when working with power tools, automotive lifts, lifting tools, jack stands, electrical equipment, blunt instruments, chemicals, lubricants, or any other tools or equipment seen or implied in this website. Due to factors beyond the control of DiagnosticMechanic.com, no information contained in this website shall create any express or implied warranty or guarantee of any particular result. Any injury, damage or loss that may result from improper use of these tools, equipment, or the information contained in this website is the sole responsibility of the user and not DiagnosticMechanic.com.
DiagnosticMechanic.com is a participant in the Amazon Services LLC Associates Program, an affiliate advertising program designed to provide a means for sites to earn advertising fees by advertising and linking to Amazon.com. In many of our case studies, articles, and tool reviews, we may earn a small commission when readers purchase products through our links.